Injection molding is a cornerstone of modern manufacturing, enabling the mass production of precise plastic parts for industries ranging from automotive to medical devices. However, even the most well-designed molds can encounter issues, leading to defects like incomplete parts, excess material, or surface imperfections. These problems not only compromise product quality but can also result in costly production delays1. That’s where effective troubleshooting and repair come in—essential skills for maintaining efficiency and ensuring your molds perform at their best.
Injection molding injects molten plastic into molds to create precise parts, but defects can occur, requiring troubleshooting and repair2 to maintain quality and efficiency in industries like automotive and medical.
In this guide, we’ll walk you through everything you need to know about troubleshooting and repairing injection molds—from understanding common defects3 to mastering the repair process. Let’s dive in!
Effective troubleshooting can reduce production downtime by up to 30%.True
By quickly identifying and addressing mold issues, manufacturers can prevent extended delays and maintain production schedules.
Injection molding is only used for plastic parts.False
While primarily used for plastics, injection molding can also be applied to metals and other materials in specialized processes.
- 1. What Is Injection Molding and Why Is Troubleshooting Important?
- 2. What Are the Common Defects in Injection Molding and How Do You Troubleshoot Them?
- 3. What Is the Process for Repairing Injection Molds?
- 4. What Practical Tools Can Aid in Troubleshooting and Repair?
- 5. What Related Technologies Enhance Mold Repair?
- 6. Conclusion
What Is Injection Molding and Why Is Troubleshooting Important?
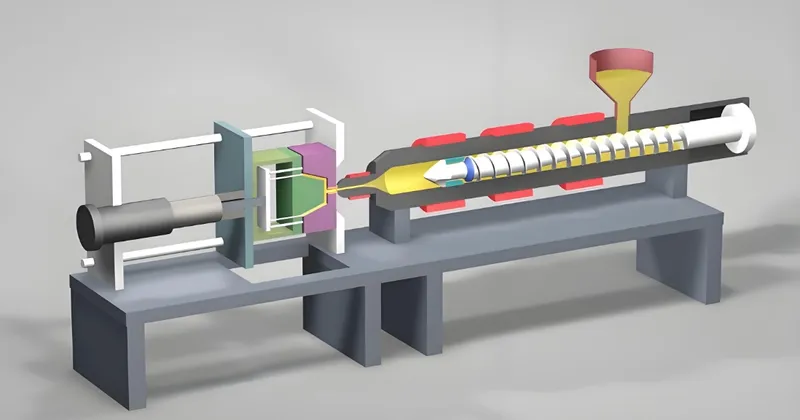
Injection molding is a manufacturing process where molten plastic is injected into a mold to create parts with precise shapes and sizes. The mold itself is a complex tool, typically made from hardened steel or aluminum, consisting of a cavity (the part’s outer shape) and a core (its inner shape). Features like runners, gates, cooling channels, and ejector pins are integral to its function.
Troubleshooting4 is the process of identifying and resolving issues that cause defects in molded parts or disrupt production. These defects can stem from incorrect process settings, material inconsistencies, or mold damage. Repair5, on the other hand, involves restoring the mold to its optimal condition by fixing wear, cracks, or other damage.
Why does this matter? Even minor defects can lead to significant production losses6, increased scrap rates, and compromised part quality. By mastering troubleshooting and repair, you can minimize downtime, reduce costs, and ensure consistent output.
What Are the Common Defects in Injection Molding and How Do You Troubleshoot Them?
Defects in injection molding can arise from various factors, including process parameters, material properties, and mold condition. Below, we’ve outlined some of the most common defects, their causes, and troubleshooting steps to resolve them.
| Defect | Description | Causes | Troubleshooting |
|---|---|---|---|
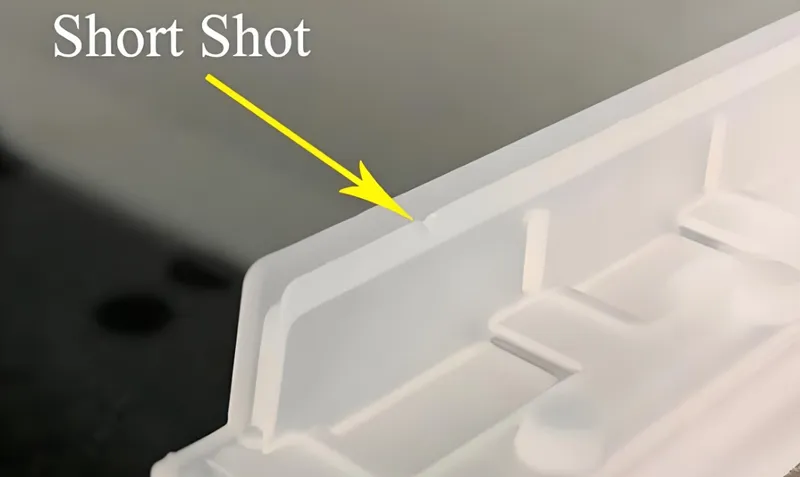
| Short Shot7 | Incomplete part due to unfilled cavities | Low pressure, insufficient material, blocked gates | Increase pressure, check material supply, clean gates |
| Flash8 | Excess material on part edges | High pressure, worn mold | Reduce pressure, inspect and repair mold |
| Sink Marks | Depressions on surface from shrinkage | Insufficient holding, short cooling time | Extend holding/cooling time, optimize cooling |
| Warpage9 | Distorted part shape from uneven cooling | Differential cooling, high temps | Reduce temps, increase cooling time |
| Burn Marks | Discoloration from overheating | High melt temp, restrictive flow paths | Lower temp, optimize flow paths |
Short Shot
A short shot occurs when the mold cavity isn’t fully filled, resulting in an incomplete part. This might be due to insufficient material, low injection pressure, or blocked gates. To troubleshoot, check the material supply, ensure gates and runners are clear, and consider increasing injection pressure or melt temperature.
Flash
Flash appears as thin, excess material along the part’s edges, often caused by excessive injection pressure or worn mold components. Reduce the pressure, inspect the mold for gaps or misalignment, and repair or replace worn parts as needed.
Sink Marks
Sink marks are small depressions on the part’s surface, typically from uneven cooling or insufficient holding pressure. Extend holding and cooling times or improve the mold’s cooling channels to address this issue.
Warpage
Warpage results in distorted parts due to uneven cooling or high residual stress. Ensure uniform cooling by adjusting temperatures and extending cooling times, and increase packing pressure to reduce internal stresses.

Burn Marks
Burn marks are discolored areas caused by overheating, often from high melt temperatures or poor venting. Lower the melt temperature, optimize screw speed, and ensure proper venting to prevent this defect.
Most injection molding defects can be resolved by adjusting process parameters.True
Many defects, like short shots or warpage, are directly linked to incorrect temperature, pressure, or cooling settings.
Mold damage is always the cause of defects in injection molding.False
While mold damage can contribute, many issues stem from process settings or material inconsistencies.
What Is the Process for Repairing Injection Molds?
Repairing an injection mold follows a structured process to restore it to optimal condition. Here’s how it works:
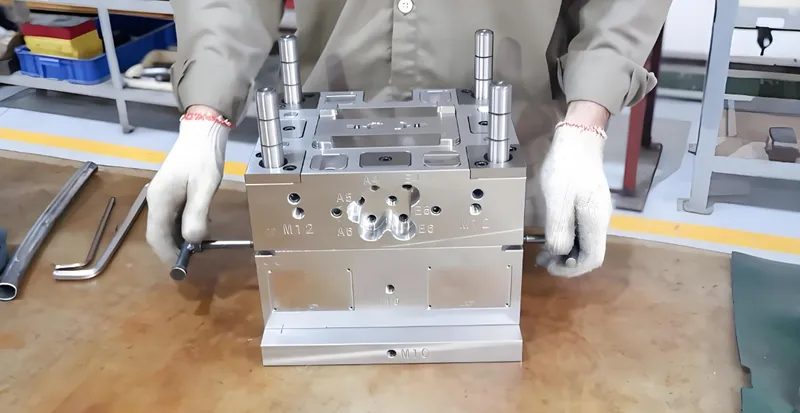
1. Inspection and Diagnosis
Visually inspect the mold for wear, cracks, or contamination. Review maintenance records for recurring issues and disassemble the mold if needed to check internal components like ejector pins or cooling channels.
2. Planning the Repair
Identify the root cause—such as wear from abrasive materials or mechanical damage—and choose the repair method (e.g., polishing, welding, or part replacement). Gather the necessary tools and materials.
3. Executing the Repair
Perform the repair using techniques like:
-
Polishing: For minor surface wear or scratches.
-
Laser Micro-Welding: For precise fixes of small cracks (MoldMaking Technology).
-
Component Replacement: Swap out worn parts like ejector pins.
4. Testing and Validation
Run test cycles to produce sample parts, inspecting them for defects. Adjust process parameters as needed to ensure quality output.
5. Documentation
Record the repairs, adjustments, and test results. Update maintenance logs to track performance and schedule future care.
Laser micro-welding is a highly effective repair technique for injection molds.True
It provides precise repairs with minimal heat impact, preserving mold integrity.
All mold repairs require complete disassembly.False
Minor repairs like polishing can often be done without full disassembly.
What Practical Tools Can Aid in Troubleshooting and Repair?
Here are some tools and aids to streamline the process:
Mold Maintenance Checklist
-
Ensure proper venting to prevent trapped air.
-
Check cooling channel efficiency.
-
Verify ejector pin alignment.
-
Inspect moving parts for wear.
Decision-Making Aid
For a short shot:
-
Check material supply.
-
Adjust injection pressure.
-
Inspect gates for blockages.
A maintenance checklist can prevent up to 50% of common mold issues.True
Regular checks catch problems early, reducing the need for extensive repairs.
-
Upstream: CNC machining for mold creation, 3D printing for prototyping parts.
-
Downstream: Automation in mold handling, data analytics for predictive maintenance.
3D printing can be used to create replacement mold parts.True
It enables rapid prototyping of custom components, cutting downtime.
Conclusion
Troubleshooting and repairing injection molds10 is vital for maintaining production efficiency and part quality. By understanding defects, following a structured repair process11, and using practical tools, you can keep your molds in top shape. Preventive maintenance is your best ally—regular care can extend mold life and save you from costly repairs.
-
Learn strategies to minimize production delays, which can save costs and improve efficiency in your manufacturing operations by exploring this valuable resource. ↩
-
Explore this resource to enhance your skills in troubleshooting and repair, ensuring high-quality production and efficiency in your manufacturing processes. ↩
-
Understanding common defects is crucial for maintaining product quality; this link will provide insights into identifying and resolving these issues effectively. ↩
-
Understanding troubleshooting techniques can significantly enhance production efficiency and part quality in injection molding. ↩
-
Learning effective repair methods can extend the life of molds and reduce production costs, ensuring better quality parts. ↩
-
Identifying causes of production losses can help implement strategies to improve efficiency and reduce waste in manufacturing processes. ↩
-
Understanding Short Shot defects can help improve production efficiency and part quality. Explore this resource for detailed insights. ↩
-
Preventing Flash defects is crucial for maintaining product quality. Discover effective strategies to tackle this issue. ↩
-
Preventing Warpage is essential for achieving precise part dimensions. Learn about best practices to ensure quality in your molds. ↩
-
Explore this link to learn essential maintenance tips that can enhance the longevity and efficiency of your injection molds. ↩
-
Understanding the structured repair process can help you effectively troubleshoot and fix issues, improving production quality. ↩